


Table of Contents Show
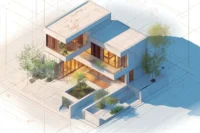
Photorealistic architectural renderings are computer-generated images that replicate the appearance of real photographs, capturing accurate lighting, materials, textures, and environmental conditions of a proposed building or space. These visualizations allow architects, developers, and clients to experience a design before construction begins, reducing costly revisions and improving project communication.
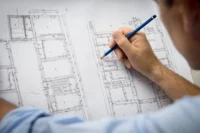
If you have ever tried to explain a design concept using flat floor plans or basic 3D models, you already know the gap between what you see in your mind and what the client understands. Photorealistic architectural renderings close that gap. They turn abstract blueprints into lifelike images that clients, investors, and planning committees can immediately grasp. The technology behind these visuals has evolved rapidly, and the tools available today put professional-quality results within reach of small studios and solo practitioners, not just large visualization firms.
According to the IMARC Group, the global visualization and 3D rendering software market reached USD 3.7 billion in 2024 and is projected to grow at a CAGR of 16.3% through 2033. That growth reflects a simple reality: visual communication sells projects, prevents misunderstandings, and accelerates approvals. This guide walks through the core techniques, software options, and practical workflow steps you need to produce convincing photorealistic renders for architecture.
What Makes an Architectural Rendering Photorealistic?

A photorealistic architectural rendering succeeds when a viewer cannot immediately distinguish it from a photograph. That level of realism depends on several interconnected elements working together. Getting one element wrong, even if everything else is perfect, breaks the illusion.
The foundation is accurate geometry. Real buildings have no perfectly sharp edges. Chamfered corners, slight imperfections in surfaces, and correct dimensional proportions all contribute to believability. Model in real-world units from the start, because scaling corrections later introduce errors that cascade through the entire scene.
Lighting comes next. Natural light behaves in predictable ways: it bounces between surfaces, casts soft or hard shadows depending on weather conditions, and shifts color temperature throughout the day. A photorealistic rendering of architecture must simulate these behaviors through global illumination algorithms and physically accurate light sources. For exterior renders, late afternoon sun produces warm tones and long shadows that highlight architectural form. Interior scenes typically combine window light with artificial fixtures to create layered illumination.
Materials and textures round out the core triad. Physically Based Rendering (PBR) materials mimic how real surfaces interact with light. Wood grain varies subtly across a surface. Glass picks up reflections from the surrounding environment. Concrete shows slight weathering and tonal variation. Without these details, even a well-lit, well-modeled scene looks synthetic.
Best Photorealistic Architectural Rendering Software
Choosing the right photorealistic architectural rendering software depends on your project requirements, timeline, and budget. Each tool excels in specific areas, and many professional studios combine two or more applications to balance speed with image quality.
Comparison of Leading Rendering Software
The following table compares the most widely used tools for 3D photorealistic architectural rendering based on key features and typical use cases:
| Software | Rendering Type | Best For | Learning Curve | Typical Use |
|---|---|---|---|---|
| V-Ray (Chaos) | Ray-traced (CPU/GPU) | Pixel-perfect realism | Moderate to steep | Competition entries, marketing |
| Corona Renderer | Ray-traced (CPU) | Intuitive quality with minimal setup | Low to moderate | Interiors, product shots |
| Enscape | Real-time | Fast feedback during design | Low | Design reviews, client walkthroughs |
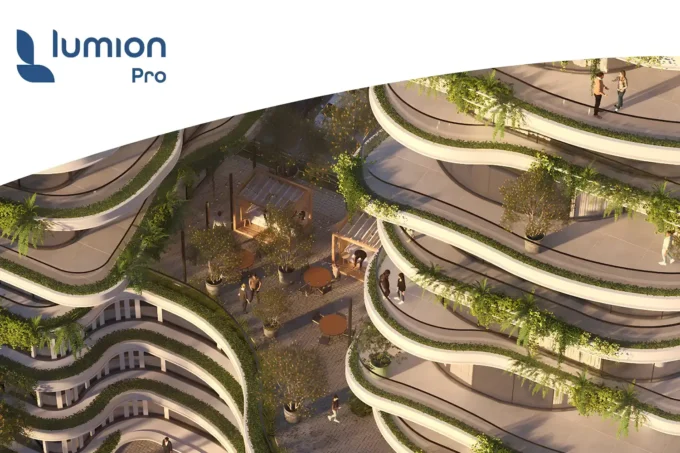
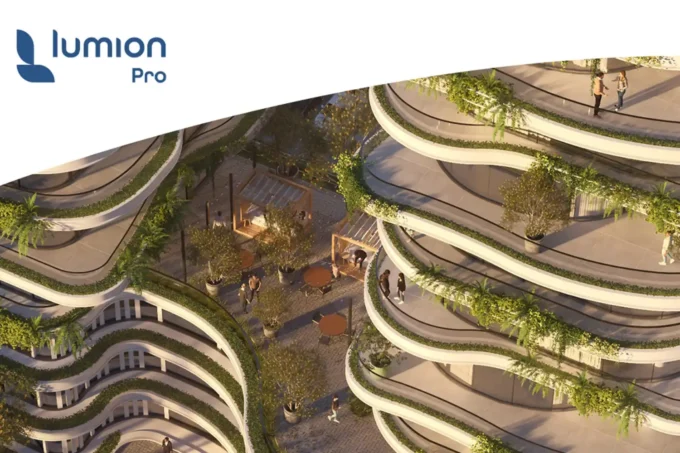
| Lumion | Real-time (GPU) | Speed and ease of use | Low | Quick presentations, animations |
| Unreal Engine 5 | Real-time (GPU, Lumen/Nanite) | Interactive experiences, VR | Steep | VR tours, cinematic sequences |
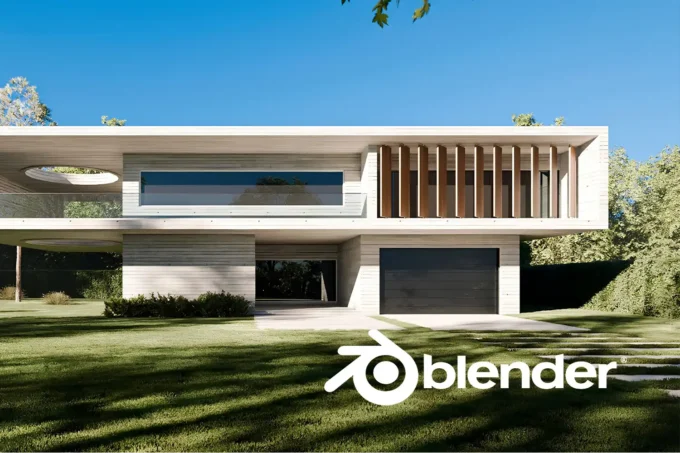
| Blender (Cycles) | Ray-traced (CPU/GPU) | Free, open-source flexibility | Moderate to steep | Studios on tight budgets |
| D5 Render | Real-time ray tracing (GPU) | Quick photorealistic output | Low | Fast iteration, concept visuals |
V-Ray remains the industry benchmark for the best photorealistic architectural rendering software, particularly when paired with 3ds Max or SketchUp. Its ray tracing engine calculates how light interacts with every surface in a scene, producing results that match studio photography. Corona Renderer, now also part of the Chaos ecosystem, offers a simpler setup process while delivering comparable image quality.
Real-time tools such as Enscape and Lumion have closed much of the quality gap. They work directly inside modeling applications like Revit and SketchUp, which eliminates the need to export geometry to a separate rendering environment. For many firms, this integration reduces turnaround from days to hours.
AI-powered rendering tools represent the newest category. Applications like AI-supported architectural rendering software can generate photorealistic images from simple sketches or basic 3D models in seconds. While they lack the fine control of traditional renderers, they are valuable for early-stage concept visualization and rapid iteration.
Step-by-Step Workflow for Photorealistic 3D Rendering in Architecture

Producing photorealistic 3D rendering for architecture follows a consistent workflow regardless of the software you choose. Understanding each phase helps you allocate time effectively and avoid common bottlenecks.
1. Scene Preparation and Modeling
Start with clean geometry. Remove hidden faces, fix overlapping meshes, and ensure all surfaces have correct normals. Your CAD model from Revit, ArchiCAD, or SketchUp provides the base, but rendering-ready geometry often needs optimization. Simplify distant objects that will not be seen in detail, and add geometric detail to hero elements that the camera focuses on.
2. Material Assignment and Texturing
Apply PBR materials using high-resolution texture maps. Each material needs at minimum a diffuse (color) map, a roughness map, and a normal or bump map. For surfaces close to the camera, such as kitchen countertops or facade cladding, consider displacement maps that create actual geometric depth rather than just the illusion of it. Libraries from Chaos Cosmos, Poliigon, or Quixel Megascans provide scanned real-world materials that save considerable production time.
3. Lighting Setup
Lighting makes or breaks photorealistic architectural renders. For exterior scenes, use an HDRI (High Dynamic Range Image) sky combined with a physical sun system. For interiors, layer window-admitted daylight with IES-profiled artificial fixtures. Avoid ambient light sources; they flatten shadows and remove the depth cues that make a scene feel three-dimensional.
4. Camera and Composition
Treat your virtual camera like a real one. Set focal length (typically 24mm for wide interiors, 50mm for natural-looking exteriors), adjust depth of field to focus on key architectural elements, and compose the frame using established principles like the rule of thirds. A good camera position tells a story about the space, whether it is the feeling of openness in a lobby or the intimacy of a reading nook.
5. Rendering and Post-Production
Configure your render settings for the final output resolution, enable global illumination, and set noise thresholds a
ppropriate for your deadline. Most modern renderers include AI-based denoisers that dramatically cut render times while preserving detail. After rendering, bring the image into post-production software for color grading, contrast adjustments, and the addition of atmospheric effects such as lens flare or subtle chromatic aberration.
How Much Do Photorealistic Architectural Renderings Cost?

Pricing for photorealistic architectural renderings varies significantly based on complexity, resolution, and turnaround time. Simple interior views for a single room typically range from $250 to $800, while complex exterior scenes with detailed landscaping, pedestrian activity, and atmospheric effects can cost between $1,500 and $10,000 per image. Animation walkthroughs run substantially higher, often reaching $5,000 to $30,000 or more depending on length and level of detail.
Factors that influence cost include the number of revision rounds, the quality of source materials provided (complete BIM models require less preparation than rough sketches), and whether the project demands custom-modeled assets or standard library objects. Rush deadlines typically add a 20% to 50% premium.
Cost figures are approximate and vary by region, studio experience level, and project scope. Always request detailed quotes from multiple providers before committing.
Why Photorealistic Rendering Matters for Architecture Projects
The practical benefits of photorealistic rendering in architecture extend well beyond impressive visuals. These renders serve as decision-making tools at every project phase.
During design development, photorealistic renders reveal material conflicts, scale issues, and spatial relationships that are difficult to evaluate in wireframe or shaded views. Catching these problems before construction documentation saves both time and money. Real estate developers use photorealistic images to pre-sell units in buildings that have not yet broken ground. According to Technavio, the architectural rendering software market is forecast to grow by USD 2.21 billion between 2024 and 2029, driven largely by real estate marketing demand and construction industry adoption.
Planning and zoning approvals move faster when review committees can see exactly what a proposed building will look like in its context. Inserting a rendered building into a photograph of the actual site (a technique called photo-matching or photo-compositing) addresses neighborhood concerns far more effectively than elevations or sectional drawings.
“The best sustainable buildings are not the ones with the most technology, but the ones that work with their climate, not against it.”
— Bjarke Ingels, Founder of BIG Architects
This principle applies directly to visualization: the most convincing photorealistic renders are not the ones with the most effects, but the ones that accurately represent how light, materials, and environment interact with the architecture.
Common Mistakes That Ruin Architectural Photorealistic Rendering
Even experienced 3D artists fall into patterns that undermine realism. Recognizing these pitfalls early can save hours of troubleshooting.
Poor glass handling is one of the most frequent issues. Glass should reflect its environment, show slight color tinting, and transmit light with physically correct refraction. Many beginners make glass too transparent or too reflective, neither of which matches reality. Similarly, incorrect scale destroys believability instantly. Grass blades that are too large, door handles at the wrong height, or ceiling heights that feel off all signal to the viewer that something is artificial.
Over-processing in post-production is another trap. Heavy-handed bloom, lens flare, or color grading can push a render into territory that looks more like a video game screenshot than a photograph. Subtlety is the guiding principle. Study real architectural photography, and notice how restrained the effects are in published images.
Flat lighting remains the single biggest killer of realism. If your scene lacks contrast between light and shadow, the render will look dull regardless of how detailed the geometry and textures are. Introduce depth by using directional light sources, and ensure that shadows have soft falloff rather than hard binary edges.
The Role of AI in Photorealistic 3D Rendering for Architecture

Artificial intelligence is reshaping the photorealistic rendering pipeline at multiple stages. AI-powered denoisers, first introduced by NVIDIA with OptiX and now standard in V-Ray and Corona, reduce render times by 50% to 80% while maintaining visual quality. This means a render that previously took 4 hours can now finish in under an hour.
Generative AI tools take a different approach entirely. Instead of simulating light physics, they use trained neural networks to produce images from text descriptions or basic 3D inputs. While these tools cannot yet match the precision of traditional rendering for construction documentation or final marketing materials, they excel at rapid concept exploration. An architect can test ten different facade material combinations in the time it would take to set up a single traditional render.
Material generation is another area where AI adds value. Tools like V-Ray’s AI Material Generator can create render-ready PBR materials from a simple photograph, eliminating the manual process of configuring diffuse, roughness, and normal maps. As these technologies mature, the line between AI-assisted and traditional photorealistic architectural renderings will continue to blur.
For a deeper look at how AI tools integrate into architectural workflows, see our guide on enhancing architectural designs with AI rendering tools.
Getting Started with Photorealistic Renders
If you are new to architectural visualization, start with the fundamentals. Good geometry, accurate materials, and physically correct lighting produce 90% of the realism in any render. The remaining 10% comes from camera composition, atmospheric effects, and post-processing polish.
Pick one rendering engine and learn it thoroughly before experimenting with alternatives. For beginners, affordable and accessible tools like Lumion or D5 Render provide a gentle learning curve with impressive results. As your skills develop, transition to V-Ray or Corona for maximum creative control.
Study real architectural photography. Visit ArchDaily and Dezeen and pay attention to how professional photographers frame buildings, handle light, and compose their shots. The closer your rendering approach mirrors real photographic technique, the more photorealistic your results will be.
Practice with a single room or a small exterior scene before tackling complex projects. Master one lighting condition (such as overcast daylight for interiors) before experimenting with challenging scenarios like dusk or night scenes. Each project you complete builds your library of materials, techniques, and reusable scene elements that make the next project faster and better.
- 3d photorealistic architectural rendering
- architectural photorealistic rendering
- best photorealistic architectural rendering software
- photorealistic 3d rendering for architecture
- photorealistic architectural rendering
- photorealistic architectural rendering software
- photorealistic architectural renderings
- photorealistic architectural renders
- photorealistic rendering architecture
- photorealistic rendering of architecture


Leave a comment