


Table of Contents Show
The kitchen work triangle is the imaginary triangle drawn between the sink, the cooktop and the refrigerator. Under the National Kitchen & Bath Association planning guidelines, its three legs should add up to no more than 26 feet (7.9 m), and no single leg should be shorter than 4 feet (1.2 m) or longer than 9 feet (2.7 m).
That rule of thumb is older than most of the kitchens it gets applied to. It was measured, argued over and written down in the late 1940s for small, one-cook houses, and designers still reach for it because it answers a practical question in seconds: will the person cooking walk too far, or bump into everything? The sections below cover the actual numbers, where they came from, how to measure them on a plan, and how the working triangle of a kitchen behaves once you add an island, squeeze it into a galley or stretch it along one wall.
What Is the Kitchen Work Triangle?
The kitchen work triangle is a planning check, not a shape you have to build. Each corner is a work center: the cleanup and prep sink, the cooking surface and the refrigerator. The NKBA defines a work center as a major appliance plus the landing and work area around it, and the triangle is simply the three distances between those centers.
A good triangle does two things at once. It keeps the three centers close enough that the cook is not hiking across the room with a dripping colander, and far enough apart that there is still counter between them to set things down. Most of the kitchen work triangle rules exist to protect that second point, which gets forgotten more often than the first.
Where the idea came from
The logic started with motion study. Lillian Gilbreth, the industrial psychologist and engineer, worked with the Brooklyn Borough Gas Company on the Kitchen Practical, unveiled in 1929 at a Women’s Exposition. As writer Alexandra Lange explains in her Slate essay on Gilbreth, the L-shaped arrangement Gilbreth called “circular routing” became known as the kitchen work triangle in the 1940s.
The numbers came later, from the University of Illinois. The Small Homes Council’s 1949 circular C5.32, Kitchen Planning Standards, written by Elizabeth M. Ranney, analyzed the kitchens of 103 mass-produced house plans and set recommended distances between appliances. It is the first document most histories point to when they say the triangle was “formalized.”
📌 Did You Know?
The 1949 Illinois circular left the wall oven out of the triangle on purpose. Its scoring sheet notes that trips to a separate oven are “negligible (5 per cent)” compared with trips to the sink, range and refrigerator. The same study found traffic running through the work area in 59 of the 103 house plans it reviewed.
Kitchen Work Triangle Rules and Dimensions
The current reference most North American designers use is Guideline 3, “Distance between Work Centers,” in the NKBA Kitchen Planning Guidelines with Access Standards. Guidelines 4 and 5 add two layout conditions that belong to the same check. Together they give you five kitchen work triangle rules:
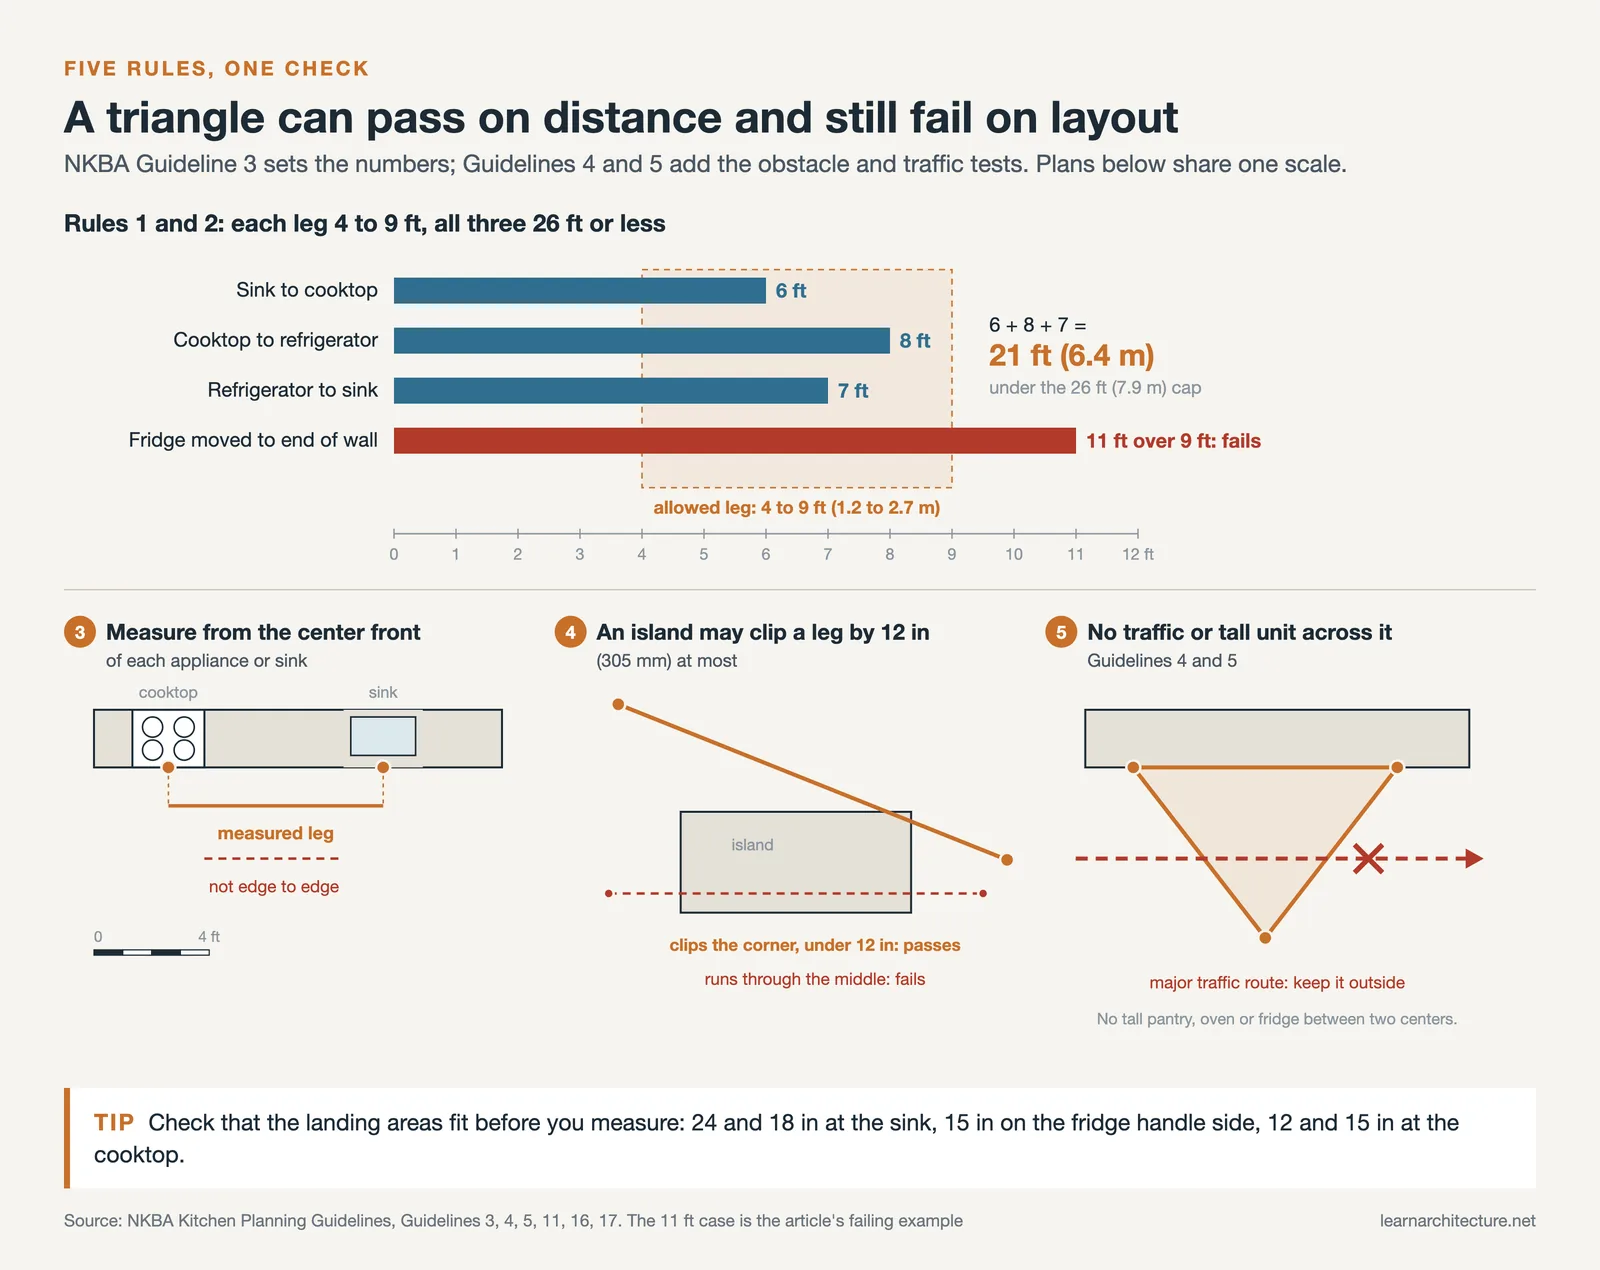
- The three legs together total no more than 26 feet (7.9 m).
- No leg is shorter than 4 feet (1.2 m) or longer than 9 feet (2.7 m).
- Each leg is measured from the center front of the appliance or sink, not from its side or back.
- No leg cuts through an island, peninsula or other obstacle by more than 12 inches (305 mm).
- No major traffic route crosses the triangle, and no full-height, full-depth tall unit (a tall oven cabinet, pantry or refrigerator) sits between two of the work centers.
If the kitchen has more than three primary work centers, such as a second sink or a separate oven that gets daily use, the NKBA asks that each extra travel distance also fall between 4 and 9 feet (1.2 and 2.7 m).
Kitchen work triangle dimensions: 1949 versus today
The modern numbers are looser than the originals. The Illinois researchers set a separate range for each leg and a tighter total, because they were planning small basementless houses with a single cook.
| Measurement | Small Homes Council C5.32 (1949) | NKBA Guideline 3 |
|---|---|---|
| Refrigerator to sink | 4 to 7 ft (1.2 to 2.1 m) | 4 to 9 ft (1.2 to 2.7 m) |
| Sink to range or cooktop | 4 to 6 ft (1.2 to 1.8 m) | 4 to 9 ft (1.2 to 2.7 m) |
| Range to refrigerator | 4 to 9 ft (1.2 to 2.7 m) | 4 to 9 ft (1.2 to 2.7 m) |
| Total of all three legs | Not over 22 ft (6.7 m) | Not over 26 ft (7.9 m) |
| Measured from | Center front of each appliance | Center front of each appliance or sink |
| Obstacles | Traffic through the triangle to be avoided | Island may intrude up to 12 in (305 mm); no major traffic |
The 1949 circular also explains why the sink to range leg got the shortest range: research at the time showed it was “the most frequently traveled path in practically all kitchens.” That is still a useful tiebreaker. When you cannot tighten every leg, tighten that one.
Why the minimum leg matters as much as the maximum
People remember the 26 foot ceiling and forget the 4 foot floor. The Illinois authors put it plainly: too small a distance between appliances means there is not enough counter, while too great a distance means the room is being used uneconomically. Four feet is roughly what it takes to fit the landing areas the NKBA asks for between centers: at least 24 inches (610 mm) on one side of the sink and 18 inches (457 mm) on the other, 15 inches (381 mm) on the handle side of the refrigerator, and 12 and 15 inches (305 and 381 mm) on either side of the cooktop.
💡 Pro Tip
Before you measure any legs, check that the landing areas fit. A triangle that passes on distance but leaves 6 inches between the sink and the range will fail in daily use, because there is nowhere to drain a pot. Draw the landing zones as hatched rectangles on the plan first, then place the triangle over them.
How to Measure a Work Triangle on a Kitchen Plan
You can check any layout in five minutes with a scaled plan and a ruler, or a dimension tool in CAD. If you are still drafting the room, our guide on how to draw a floor plan to scale covers the setup.
- Mark the center front of the main sink bowl, the center front of the cooktop or range, and the center front of the refrigerator door (on a side-by-side, use the center of the pair).
- Draw straight lines between the three points. Measure each one.
- Check each leg against the 4 to 9 foot band, then add them and check against 26 feet.
- Look along each leg. If it passes through an island or peninsula, measure how far it runs inside the counter footprint. More than 12 inches is a fail.
- Draw the main circulation routes: entry door to back door, living area to the fridge, the route to the dining table. If one crosses a leg, the triangle fails the traffic test even when the numbers pass.
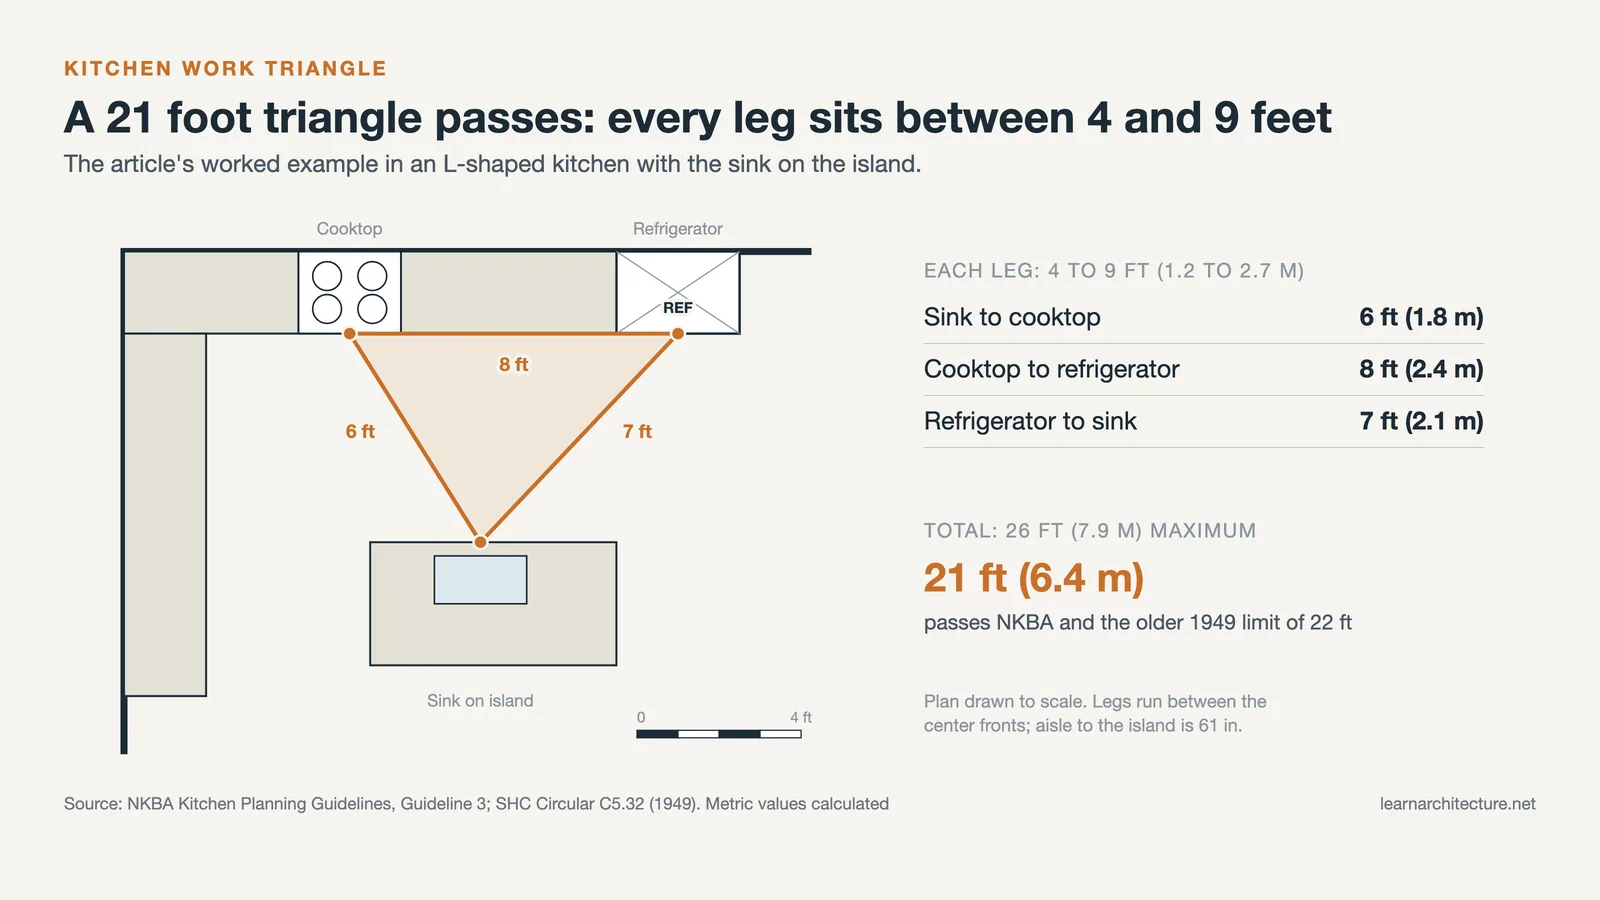
A worked example: sink to cooktop 6 feet, cooktop to refrigerator 8 feet, refrigerator to sink 7 feet. Every leg sits between 4 and 9, and the total is 21 feet (6.4 m), which would pass both the NKBA limit and the older 22 foot limit. Swap the fridge to the far end of a long wall so that the cooktop to fridge leg becomes 11 feet, and the kitchen fails even though the total is still under 26.
📐 Technical Note
The work triangle is an NKBA planning recommendation, not a building code requirement. Each NKBA guideline lists “State or local codes may apply,” and the code references in the NKBA guideline document are based on the 2015 International Residential Code and ICC A117.1 2009. Check the edition your jurisdiction has adopted before treating any clearance as mandatory.
Kitchen Work Triangle With an Island
An island can make a triangle better or wreck it. The rule to remember is the 12 inch (305 mm) intrusion limit: a leg may clip the corner of an island, but it should not run through the middle of it. If the cook has to walk around a 4 foot island to get from the sink to the fridge, the real walking distance is far longer than the straight line on the plan.
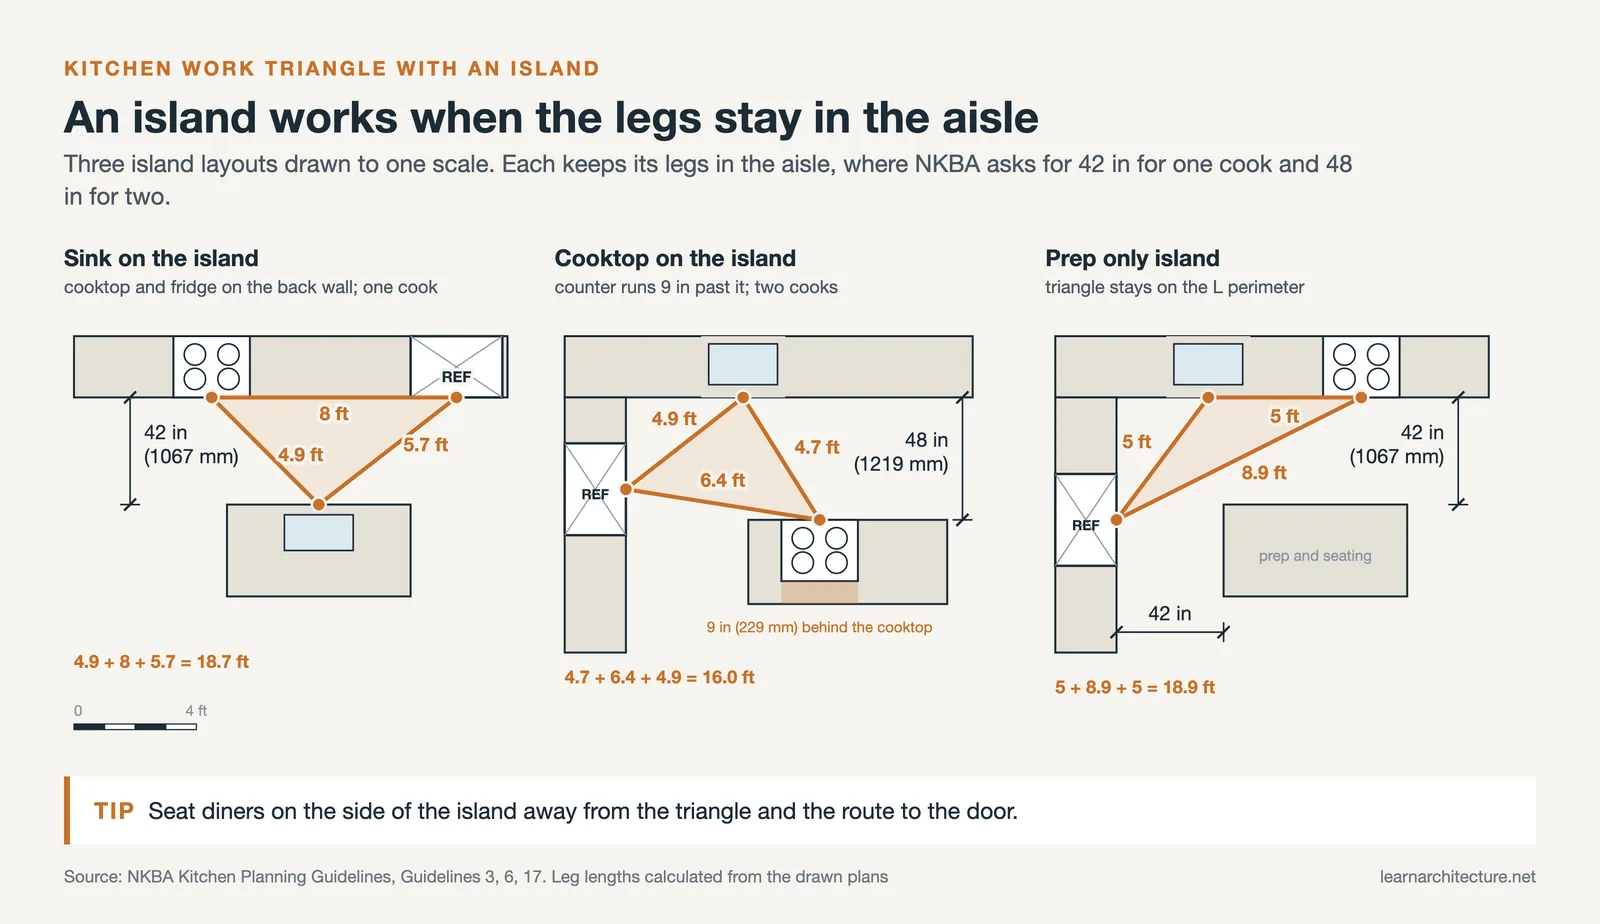
Three island setups tend to work:
- Sink on the island, cooktop and fridge on the back wall. The cook faces into the room, and the two legs to the back wall cross the aisle rather than the island.
- Cooktop on the island, sink and fridge on the perimeter. This works if the NKBA’s 9 inch (229 mm) counter extension behind the cooktop is provided when the counter is at cooktop height, and if the island does not sit in the path to the dining area.
- Island used only for prep and seating, with all three centers on the perimeter in an L or U. The island then shortens the walk to the prep surface without touching the triangle at all.
The aisle around the island is the other number to hold. NKBA Guideline 6 asks for a work aisle of at least 42 inches (1067 mm) for one cook and 48 inches (1219 mm) for more than one, measured between counter frontage, tall cabinets or appliances. The same document sets 36 inches (914 mm) as the minimum width for a walkway that is not a work aisle. Many of the island layouts in our look at open kitchen design considerations depend on getting that aisle right before anything else.
⚠️ Common Mistake to Avoid
A frequent island error is putting the seating on the side that faces the main route through the room. Diners then sit in the traffic path, and the NKBA clearance behind them jumps from 32 inches (813 mm) with no traffic to at least 36 inches (914 mm) to edge past or 44 inches (1118 mm) to walk past. Put stools on the side away from the work triangle and away from the route to the door.
Work Triangle Kitchen Layout by Kitchen Type
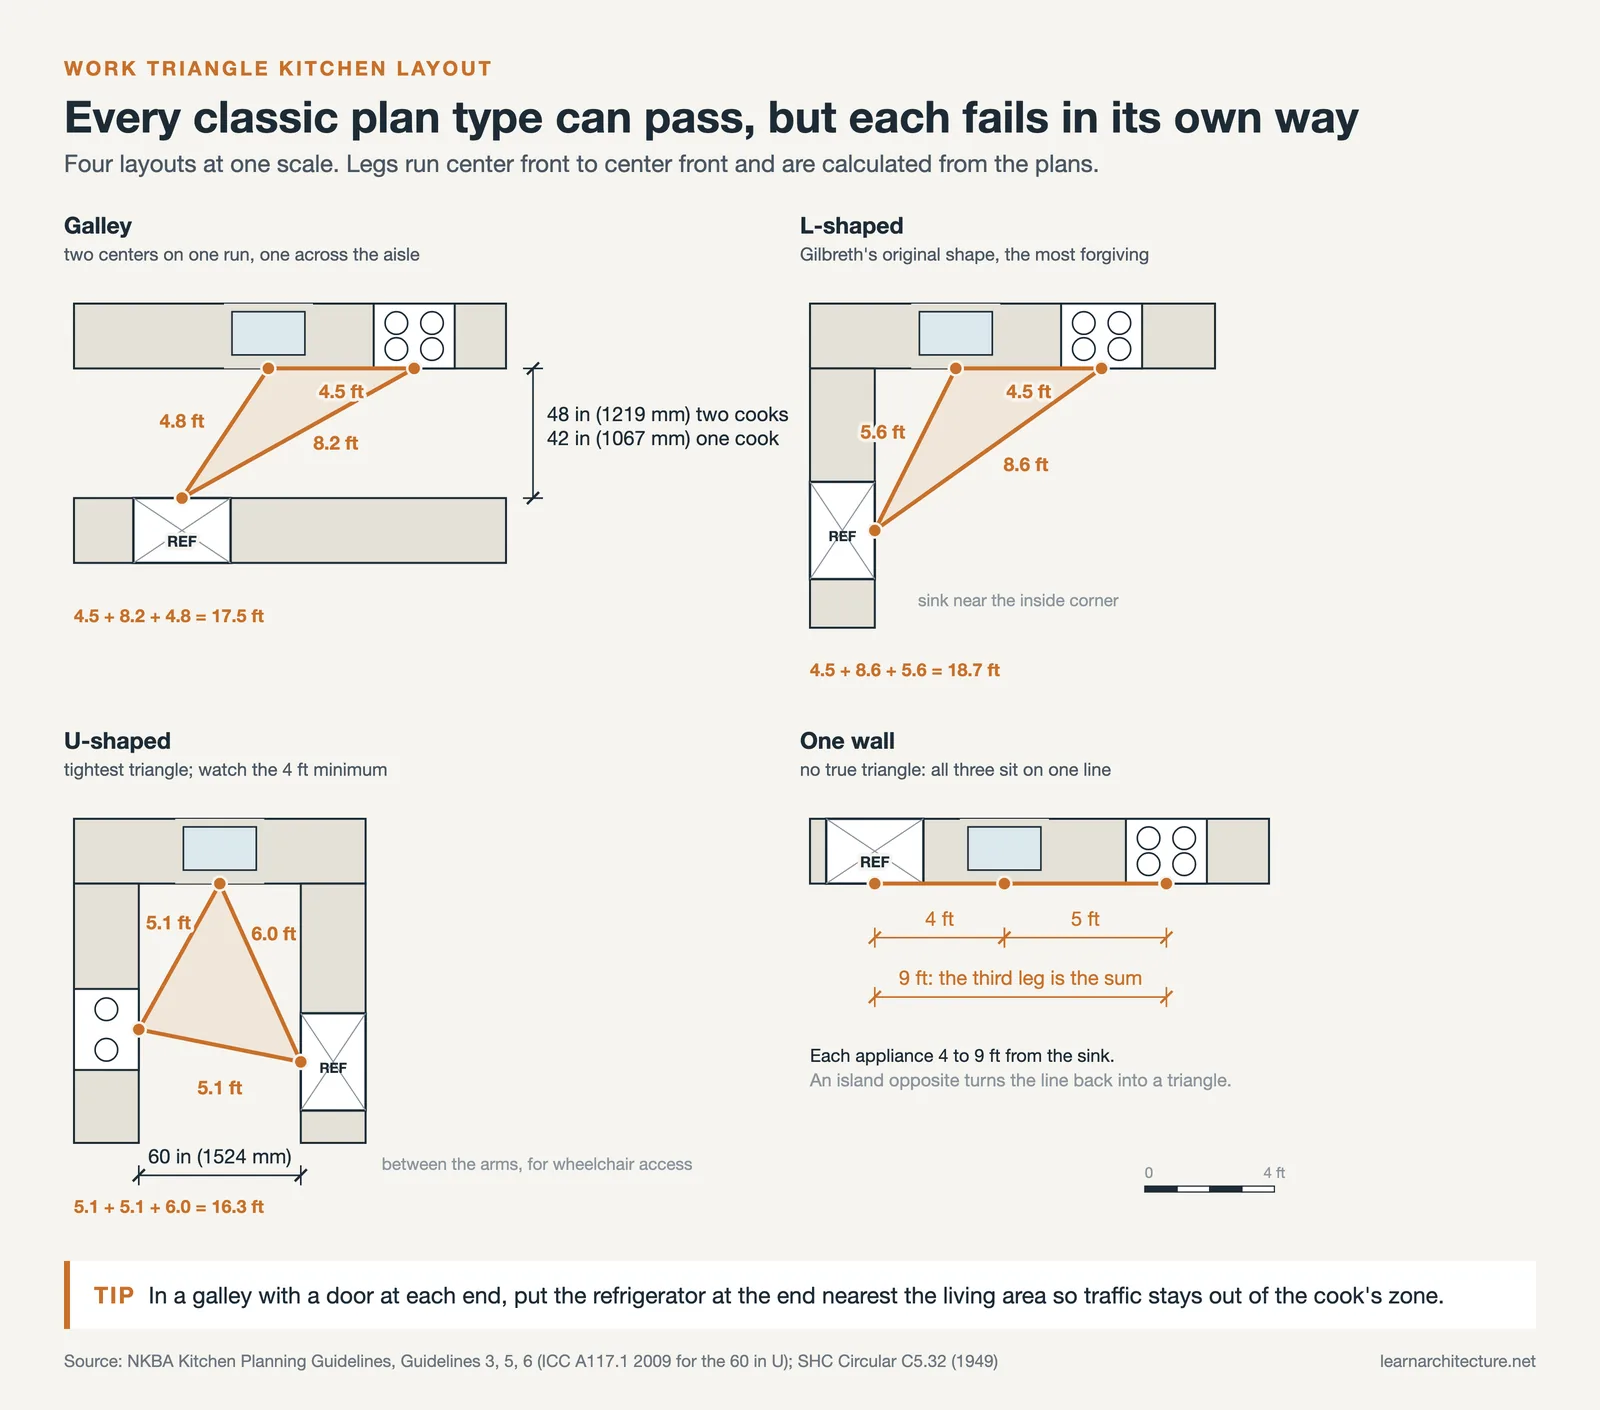
The triangle behaves differently in each of the classic plan types. Our overview of types of kitchens in architectural design covers the shapes themselves; here is how each one treats the triangle.
Galley kitchens
A galley is two parallel runs with an aisle between them, and it is often the easiest place to hit the numbers. Put two centers on one side and one on the other, and the legs cross the aisle instead of running along a wall. The Illinois circular recommended 4 feet 0 inches between opposing cabinets or appliances and called that sufficient for two workers; the NKBA now asks for 42 inches (1067 mm) for one cook and 48 inches (1219 mm) for two. The main risk in a galley is not distance but traffic: if both ends are open doors, the aisle becomes a hallway and the triangle fails the traffic test by default.
L-shaped and U-shaped kitchens
The L is Gilbreth’s original shape and still the most forgiving. Keep the sink near the inside corner and the other two centers on the two arms. The U gives the tightest triangle, but it can become too tight: in a narrow U, two legs may drop below 4 feet and squeeze out the landing areas. For wheelchair access, the ICC A117.1 2009 reference cited in the NKBA guidelines calls for at least 60 inches (1524 mm) between the opposing arms of a U-shaped kitchen.
One-wall kitchens
A single-wall kitchen cannot form a real triangle because the three points sit on one line. The leg limits still apply, and they become a quick test for wall length: with the sink in the middle, each appliance should be 4 to 9 feet from it. Adding an island opposite the wall is the usual way to turn the line back into a triangle. For tight plans, the ideas in our piece on making a small kitchen more efficient help once the basic layout is fixed.
💡 Pro Tip
In a galley with a door at each end, move the refrigerator to the end nearest the living area. Family members can grab a drink without walking into the cook’s zone, and the triangle shrinks to the sink and cooktop legs where the actual cooking happens.
Does the Work Triangle Still Work for Modern Kitchens?
Partly. The triangle was built for one cook, one sink, one range and one refrigerator in a small closed room. Many kitchens now have two sinks, a separate wall oven, a beverage fridge and two people cooking. The NKBA already stretches the rule for that case, asking that each extra travel distance fall between 4 and 9 feet, but a triangle cannot describe two cooks moving at once.
The planning language has shifted accordingly. The summary NKBA published of its Fourth Edition Kitchen & Bath Planning Guidelines for its design competition talks about activity centers and work zone clearances rather than a triangle, asking for a work zone clearance of 48 to 52 inches (1220 to 1320 mm) at each activity center and 60 to 67 inches (1525 to 1700 mm) for a wheelchair turning circle. Designers often call this zone planning: prep, cooking, cleanup, storage and serving each get their own stretch of counter and storage.
Zones do not replace the triangle so much as sit on top of it. You still want the sink, cooktop and fridge within a few steps of each other; zones add the rule that the second cook, the kids at the fridge and the dishwasher door should not all land in the same 4 feet. Use the triangle as the first test and zone clearances as the second. Once the plan passes both, move on to working heights with our guide to standard kitchen countertop height, which the triangle says nothing about.
Kitchen planning guidelines are recommendations. Building codes and accessibility requirements vary by jurisdiction, so confirm local rules with your building department before finalizing a layout.
What This Means for Your Next Project
Your Next Step: Take your current kitchen plan, mark the center front of the sink, cooktop and refrigerator, and measure the three legs tonight. If any leg is under 4 feet or over 9 feet, or a leg runs more than 12 inches through the island, fix that before you choose a single cabinet finish.
Frequently Asked Questions
What is the ideal kitchen work triangle size?
The NKBA guideline sets a maximum of 26 feet (7.9 m) for all three legs combined, with each leg between 4 and 9 feet (1.2 and 2.7 m). The original 1949 University of Illinois standard was tighter, capping the total at 22 feet (6.7 m). A total somewhere in the high teens to low twenties usually leaves room for landing areas without extra walking.
Is the kitchen work triangle a building code requirement?
No. It is a planning recommendation from the National Kitchen & Bath Association. Building codes regulate items such as cooktop clearances, ventilation and receptacles, while the triangle is a design check you can choose to follow.
Can an island interrupt the kitchen work triangle?
An island may clip a leg by up to 12 inches (305 mm) under NKBA Guideline 3. Anything more means the cook walks around the island, so the real distance is longer than the drawn line. Placing the sink or cooktop on the island often solves the problem.
How wide should a galley kitchen aisle be?
NKBA Guideline 6 recommends at least 42 inches (1067 mm) for one cook and 48 inches (1219 mm) for multiple cooks, measured between counter fronts, tall cabinets or appliances. A walkway that is not used as a work aisle can drop to 36 inches (914 mm).












Leave a comment