


Table of Contents Show
A door and window schedule is a table in the drawing set that lists every door and window by its mark, the tag shown on the plans, and records its size, type, material, fire rating, hardware and details. The plan tells the builder where each opening is. The schedule tells them what it is.
Estimators, fabricators and hardware suppliers work directly from schedules, which is why leaving them until the last week of a project is backwards. A door schedule set up early forces decisions about fire ratings, accessibility and hardware while they are still cheap to change. This article covers the format that US standards recommend, the columns worth including, how windows differ from doors, and how to build the table in Revit or a spreadsheet.
What a Door and Window Schedule Does in a Drawing Set
A set of construction documents splits information three ways. The plans locate things. The specifications say how they are made and to what standard. The schedules sit between the two: they list each item once, with the properties that change from one item to the next.

The link that makes this work is the mark. Every door on the plan carries a tag, usually a number in a circle or hexagon, and that number appears exactly once in the first column of the door schedule. Windows work the same way, usually with a letter or type number. The graphic conventions for those tags belong with the other architectural symbols in the set’s legend.
Schedules do not have to live on the drawings. The Uniform Drawing System of the US National CAD Standard treats them as something that may be placed either on drawing sheets or in the specifications, and its mock-up procedure asks you to estimate their size early by counting the items they will hold. When they are on the drawings, the UDS sheet type designator for them is 6, Schedules and Diagrams, so an architectural door schedule typically sits on a sheet numbered A-6xx. The same module allows a schedule on a plan sheet when the information is closely associated, which is common on small projects.
The Parts of Every Schedule
The UDS Schedules module sample published by the National CAD Standard describes one format for every schedule in the set, whether it lists doors, windows, finishes or equipment. It has four standard parts and one optional one:
- Heading: the title of the schedule.
- Mark column: the first column on the far left. On a wide schedule, a second mark column on the right-hand edge makes rows easier to follow.
- Item description: the name of each item with its own mark.
- Distinguishing feature columns: the properties that set one item apart from another. A complex schedule has many.
- Notes column: a special feature column, usually on the far right, holding remarks or key numbers that refer to general notes elsewhere.
The notes column is where many schedules go wrong. Long remarks typed into a narrow cell get abbreviated until nobody can read them. The UDS sample recommends key numbers instead: a short reference in the cell, with the full note written once in a legend.
📐 Technical Note
The A/E/C Graphics Standard (US Army ERDC, Release 2.0, 2015) gives schedule outlines an extra-wide 0.70 mm line and internal grid lines a medium 0.35 mm line. It recommends schedule headings of at least 3/16 in (5 mm) and all other schedule text of at least 3/32 in (2.4 mm). Its stated bare minimum for any schedule is a heading, a mark column, an item description column and a distinguishing feature column.
How to Set Up a Door Schedule
Doors are usually scheduled one row per door, because almost every door differs from its neighbour in some way: its location, its swing, its fire rating or its lock.
Number the Doors First
Pick a numbering system before the first tag goes on the plan. Two approaches are common. Room-based numbering gives each door the number of the room it opens into, with a letter suffix when a room has more than one door, so room 204 has doors 204A and 204B. Sequential numbering runs D01, D02 and so on through the building. Room-based marks are easier to find on site; sequential marks survive room renumbering better. Either works if it is applied to every level.
Columns That Earn Their Place
A typical door schedule for a commercial project carries these columns, left to right:
- Door mark
- Location or room name
- Leaf size: width, height and thickness
- Door type, keyed to a door elevation diagram
- Door material and finish
- Frame type, material and finish
- Head, jamb and sill detail references
- Fire rating
- Hardware set
- Notes
The door type and frame type columns point to elevation diagrams drawn once on the schedule sheet: a flush leaf, a leaf with a vision panel, a pair, a leaf with sidelight. Leaf sizes follow the ranges covered in the guide to standard door sizes and clearances.
Door Schedule Example
The rows below are an illustration of format, not a real project. The fire ratings shown follow the 2021 IBC Table 716.1(2) pairings described in the next section.
| Mark | Location | Size (W × H) | Type / Material | Fire Rating | Hardware |
|---|---|---|---|---|---|
| 101 | Main entry | 3′-0″ × 7′-0″ (914 × 2134 mm) | B / aluminum and glass | None | HW-1 |
| 110 | Office from 1-hour corridor | 3′-0″ × 7′-0″ (914 × 2134 mm) | A / wood, flush | 20 min | HW-3 |
| 115 | Stair 1, 2-hour enclosure | 3′-0″ × 7′-0″ (914 × 2134 mm) | C / hollow metal, vision panel | 90 min | HW-4 |
Fire Rating and Hardware Columns
The fire rating column is where the schedule meets the building code. In the 2021 International Building Code, Section 716 on opening protectives ties the door rating to the wall it sits in through Table 716.1(2). A 2-hour enclosure around an interior exit stair takes a 1-1/2 hour door; a 1-hour fire barrier of the same kind takes a 1-hour door; a 1-hour corridor wall takes a 1/3 hour (20 minute) door. Read the rating off the wall type, then write it in the schedule, and the reviewer can check each door without hunting through the plans.
Hardware is almost never written out in full on the door schedule. Instead each door gets a hardware set number, and the full list of hinges, locks, closers and stops for each set lives in the specifications, under Division 08 Openings in the CSI MasterFormat structure (08 70 00 covers hardware). The schedule stays readable, and the hardware consultant edits one place.
⚠️ Common Mistake to Avoid
Treating the leaf width in the schedule as the clear width. Under the 2010 ADA Standards, section 404.2.3, an accessible door needs 32 in (815 mm) of clear width, measured between the face of the door and the stop with the door open 90 degrees. The door’s own thickness and the stop eat into the leaf size, so check the clear opening, not the nominal leaf, before you write the size in.
How to Set Up a Window Schedule
Windows behave differently. A building might have eighty windows but only six kinds, so windows are usually scheduled by type rather than one row per unit. Each type gets a letter or number, every window on the plans and elevations carries that type tag, and the schedule lists the type once with a quantity column if the estimator needs it.
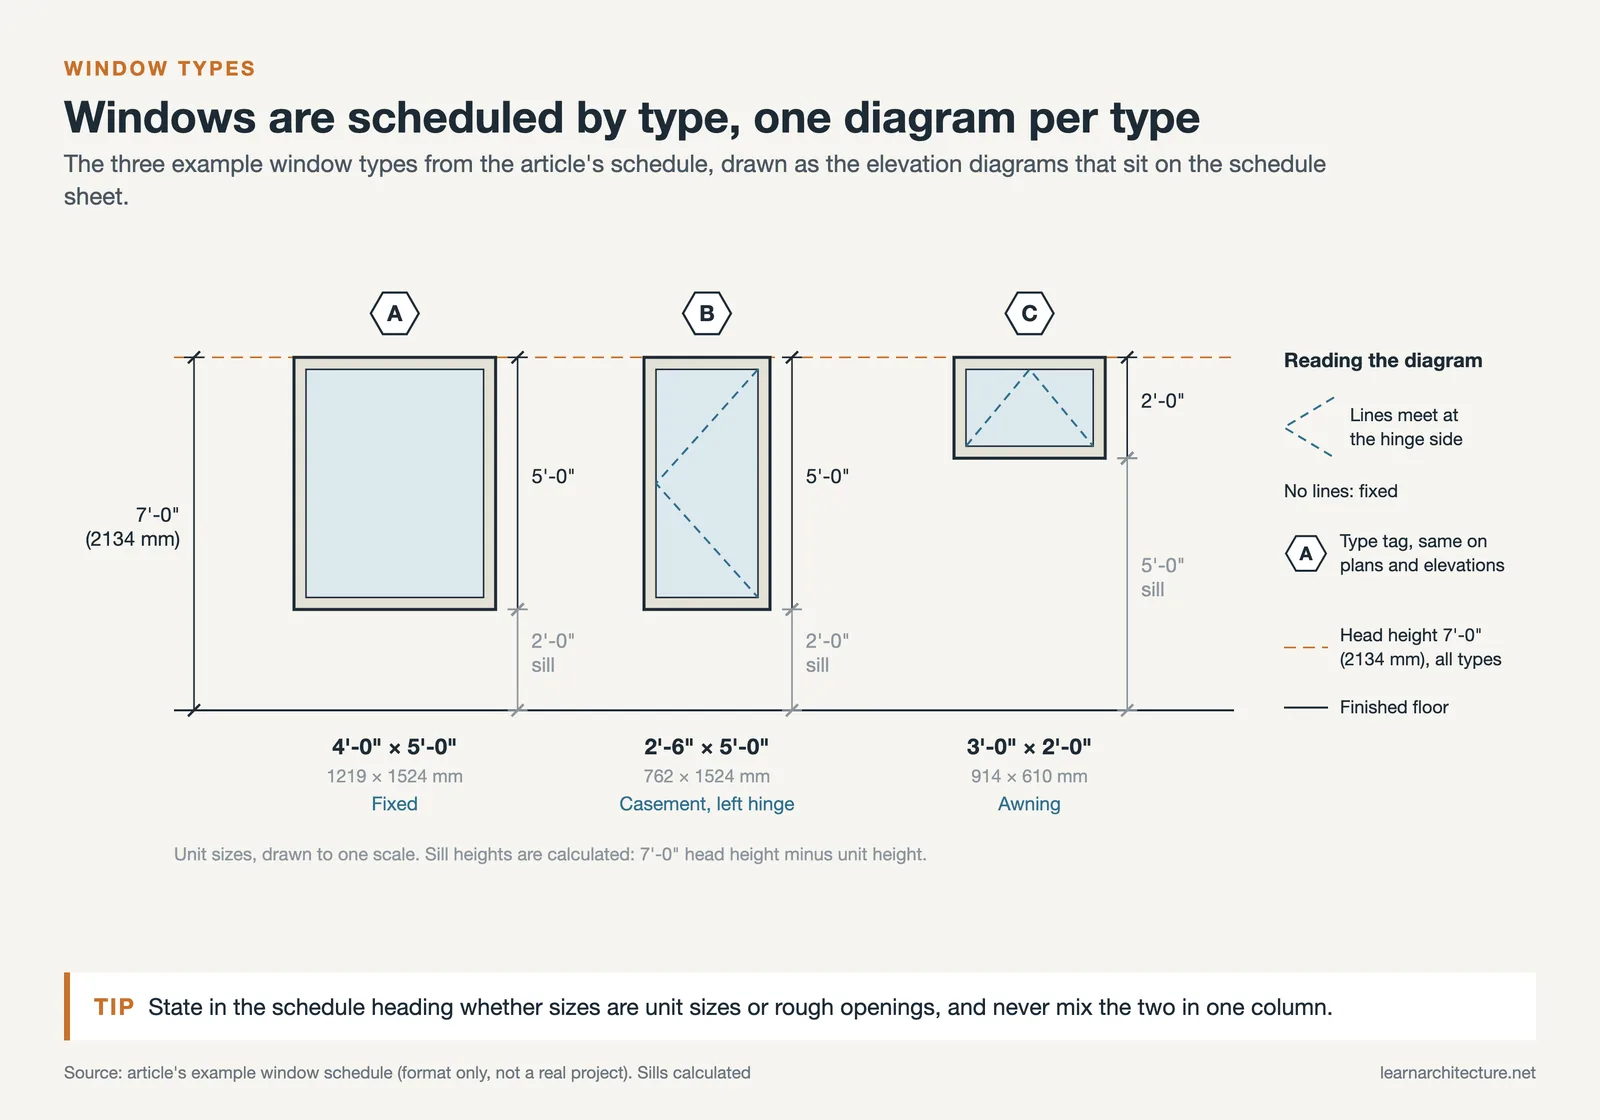
Each type is drawn as a small elevation diagram on the schedule sheet, showing the frame, the operable sashes with their hinge side marked, and the overall dimensions. That diagram does more work than any column: it shows the builder at a glance which panel opens and which way.
Window Schedule Example
A window schedule usually carries the columns below. As with the door example, the rows show format only.
| Type | Operation | Unit Size (W × H) | Frame | Head Height | Notes |
|---|---|---|---|---|---|
| A | Fixed | 4′-0″ × 5′-0″ (1219 × 1524 mm) | Aluminum | 7′-0″ (2134 mm) | 1 |
| B | Casement, left hinge | 2′-6″ × 5′-0″ (762 × 1524 mm) | Aluminum | 7′-0″ (2134 mm) | 1, 2 |
| C | Awning | 3′-0″ × 2′-0″ (914 × 610 mm) | Aluminum | 7′-0″ (2134 mm) | 3 |
Beyond these, a window schedule usually adds columns for glazing and thermal performance. In the US, the National Fenestration Rating Council label reports U-factor, solar heat gain coefficient, visible transmittance, air leakage and condensation resistance, and those are the values the energy model and the specification will ask for. Add flags for windows that must serve as emergency escape openings and for glazing in hazardous locations that must be safety glazed, since both are checked by the plan reviewer.
💡 Pro Tip
State in the schedule heading whether sizes are unit sizes or rough openings, and never mix the two. Window manufacturers quote unit dimensions; framers build rough openings. When a schedule switches between them halfway down the column, the error only shows up when the window arrives and does not fit.
Building a Door and Window Schedule Template in Revit or a Spreadsheet
In a BIM model the schedule is not drawn at all. Revit describes a schedule as a tabular display of information extracted from the properties of elements in the project, and it updates automatically when the model changes. Change a door’s manufacturer property in the model and the door schedule reflects it. Schedules can list every instance or collapse identical instances onto one row, which is exactly the split between door schedules and window type schedules.
That automation cuts both ways. A schedule is only as good as the parameters behind it, so the template matters more than the table. A good door and window schedule template fixes:
- the column set and order, following the heading, mark, description, features and notes pattern;
- shared parameters for fire rating, hardware set and detail references, so every door family carries them;
- sorting by mark and grouping by level, so the printed schedule reads in the same order as the plans;
- text heights that match the rest of the sheet.
In AutoCAD or on smaller projects, a spreadsheet linked into the sheet does the same job, as long as someone checks it against the plan tags before each issue. When the schedule changes after issue, record it properly: a revision cloud around the changed rows and a specific description in the title block revision history, such as “doors 110 to 115 fire ratings revised”.
One boundary is worth keeping clean. The door schedule records the finish of the door and frame, because those are part of the opening. The finishes of the walls, floor and ceiling around it belong in the finish schedule, which is keyed to rooms rather than openings. Keeping the two separate stops the same paint colour from appearing in two tables that can drift apart.
Fire ratings, accessibility clearances and glazing rules vary by code edition and jurisdiction. Confirm the adopted code for your project with the local building department.
What This Means for Your Next Project
A door and window schedule is a coordination tool before it is a drawing. Filling in the fire rating column early exposes wall types nobody has decided; filling in the hardware column exposes security and access questions the client has not answered yet.
Your Next Step: Before drawing the schedule itself, tag every door and window on your current plans and write the tag list out by hand. If you cannot give each door a location, a fire rating and a hardware set yet, those gaps are your list of design decisions for the week.
Frequently Asked Questions
What is a door schedule in architecture?
A door schedule is a table in the construction drawings that lists every door by its mark and records its size, type, materials, frame, fire rating, hardware set and detail references. The mark in the first column matches the door tag on the floor plan, so a reader can move from plan to schedule and back.
What is the difference between a door schedule and a window schedule?
Door schedules usually have one row per door, because doors differ in location, rating and hardware. Window schedules usually have one row per window type, because many windows are identical, with elevation diagrams showing each type’s size and operation.
Where does the door and window schedule go in a drawing set?
Under the US National CAD Standard’s Uniform Drawing System, schedules and diagrams use sheet type designator 6, so an architectural schedule sheet is typically numbered A-6xx. On small projects the schedule can sit on the plan sheet, and on some projects schedules are placed in the specifications instead of the drawings.
Should a window schedule show rough opening or unit size?
Either can work, but the schedule must say which one it uses and use it consistently. Unit sizes match what the manufacturer supplies; rough openings match what the framer builds. A schedule that mixes the two leaves the builder guessing which figure is meant.











Leave a comment