


Table of Contents Show
A finish schedule is a table in the drawing set that lists every room by number and name and records the finish of its floor, base, walls and ceiling, usually with the ceiling height and a remarks column. Each finish is written as a short code, such as PT-1, that a legend or the specification defines in full.
On an interior fit-out the flooring contractor, the painter, the ceiling installer and the estimator all read the finish schedule, and each reads only their own column. That makes it deceptively simple to draw and easy to get wrong: a single mistyped code can put carpet in a wet room. This article covers what a room finish schedule contains, the layout US standards recommend, how finish codes work, which code checks belong in it, and how to build a template in Revit or a spreadsheet.
What a Room Finish Schedule Covers
A room finish schedule answers one question per room: what is every visible surface made of? In a typical interior finish schedule that means:

- Floor finish
- Base (skirting), which often differs from the floor
- Wall finishes, either one entry for the room or one per wall
- Ceiling finish and ceiling height
- Remarks or key notes
It sits inside the wider set of construction documents alongside the other schedules, and its limits are as important as its contents. Loose furniture, fixtures and equipment belong to the FF&E package, not the finish schedule. Door and frame finishes belong to the door and window schedule, because they are part of the opening rather than the room. Keeping each finish in exactly one table prevents the same paint colour from being specified twice and revised once.
The Standard Layout for a Finish Schedule
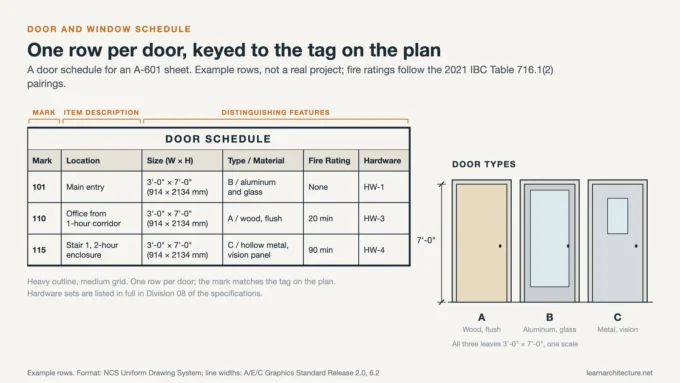
The Uniform Drawing System inside the US National CAD Standard sets one format for every schedule in a set. Its Schedules module is described as setting consistency in format, terminology and content, with guidance on how to build a project-specific schedule. Applied to finishes, the parts map like this:
- The mark column on the far left is the room number, matching the room tag on the plan.
- The item description is the room name.
- The distinguishing feature columns are floor, base, walls, ceiling and ceiling height.
- The notes column on the far right carries key numbers that point to notes written once below the schedule.
Sort the rows by room number and group them by level, so the printed schedule reads in the same order as the floor plans.
Room Finish Schedule Example
The rows below illustrate format only; the codes refer to the legend in the next section.
| Room | Name | Floor | Base | Walls | Ceiling | Ceiling Height | Notes |
|---|---|---|---|---|---|---|---|
| 101 | Reception | CT-1 | CT-1 | PT-1, north wall WC-1 | GWB, PT-3 | 10′-0″ (3048 mm) | 1 |
| 102 | Office | CPT-1 | RB-1 | PT-1 | ACT-1 | 9′-0″ (2743 mm) | |
| 103 | Toilet | CT-2 | CT-2 | CT-3 to 7′-0″ (2134 mm), PT-2 above | GWB, PT-2 | 8′-0″ (2438 mm) | 2 |
| 104 | Storage | Sealed concrete | RB-1 | PT-1 | Exposed structure | Varies | 3 |
The ceiling height column is worth including even though it is not strictly a finish. It is the one figure the ceiling installer needs from every room, and it links directly to the decisions covered in the guide to standard ceiling heights.
Finish Codes and the Finish Legend
The schedule never names products in its cells. It uses codes, and a separate finish legend on the same sheet (or a finish section in the specifications) defines each one: material, manufacturer and product, colour, size or pattern, and the specification section that governs installation.

A common approach is a short material prefix plus a number: PT for paint, CPT for carpet, RB for resilient base, CT for ceramic tile, ACT for acoustical ceiling tile, WC for wall covering. The exact prefixes vary between offices and clients, so treat these as an example rather than a standard, and put the office list in the legend. Tying each code to its MasterFormat Division 09 Finishes section keeps the schedule and the specification pointing at the same document.
Finish Legend Example
Division 09 section numbers below follow the MasterFormat structure as listed in Northern Arizona University’s Division 09 technical standards.
| Code | Material | Specification Section |
|---|---|---|
| CT-1 to CT-3 | Ceramic tile (floor, base, wall) | 09 30 13 Ceramic Tiling |
| ACT-1 | Acoustical ceiling tile | 09 51 00 Acoustical Ceilings |
| RB-1 | Resilient base | 09 65 13 Resilient Base and Accessories |
| CPT-1 | Carpet tile | 09 68 13 Carpet Tile |
| WC-1 | Wall covering | 09 72 00 Wall Coverings |
| PT-1 to PT-3 | Interior paint | 09 91 23 Interior Painting |
💡 Pro Tip
Never reuse a retired code. If the client drops PT-4 in design development, leave PT-4 unused and call the replacement PT-7. Reassigning an old code to a new colour means every earlier issue, sample board and contractor quote now describes the wrong product.
How to Set Up a Finish Schedule, Step by Step
The order below keeps the schedule tied to the plans from the first row.
- Number every room on the floor plans first. The finish schedule has no rows until the rooms do, and room numbers are the key the whole table hangs on.
- Decide how walls are recorded. For simple rooms, one wall entry plus a note for exceptions is enough. For rooms with feature walls, use separate north, east, south and west columns, or a note that points to the interior elevation.
- Build the finish legend before filling the table, so every code in a cell already has a definition.
- Fill in floor, base, walls and ceiling for each room, then add ceiling heights from the reflected ceiling plan.
- Use the notes column for transitions, accent walls and anything conditional, with key numbers rather than sentences.
- Check the schedule against the reflected ceiling plan and interior elevations before each issue.
Some information does not fit a table at all. Floor patterns, tile layouts, the exact position of a change from carpet to tile under a door, and feature wall extents are better shown on a finish plan, a floor plan drawn only to show finishes. The schedule then says “see finish plan” instead of trying to describe geometry in words. Reading the two together is a skill covered in the guide to reading architectural drawings.
Painted walls also need a substrate decision. Gypsum board finish levels run from Level 0, with no taping at all, to Level 5, which adds a skim coat over the entire surface. Northern Arizona University’s Division 09 standards, for example, call for Level 5 where gloss, semi-gloss, enamel or non-textured flat paints are specified or where lighting is severe. If a room gets a glossy paint code, check that the wall finish level in the specification matches it.
⚠️ Common Mistake to Avoid
Writing “match existing” in the finish column of a renovation schedule. The contractor cannot price or order it, and the existing material may no longer be made. Survey the existing finish, give it a code with a product or a sample reference in the legend, and use that code.
Code Checks the Finish Schedule Should Carry
Interior finishes are regulated for fire, and the schedule is the easiest place to show compliance. In the International Building Code, interior wall and ceiling finishes are grouped by their ASTM E84 test results into three classes. As the Intertek summary of ASTM E84 sets out, Class A has a flame spread index of 0 to 25, Class B 26 to 75 and Class C 76 to 200, each with a smoke-developed index of 450 or less.
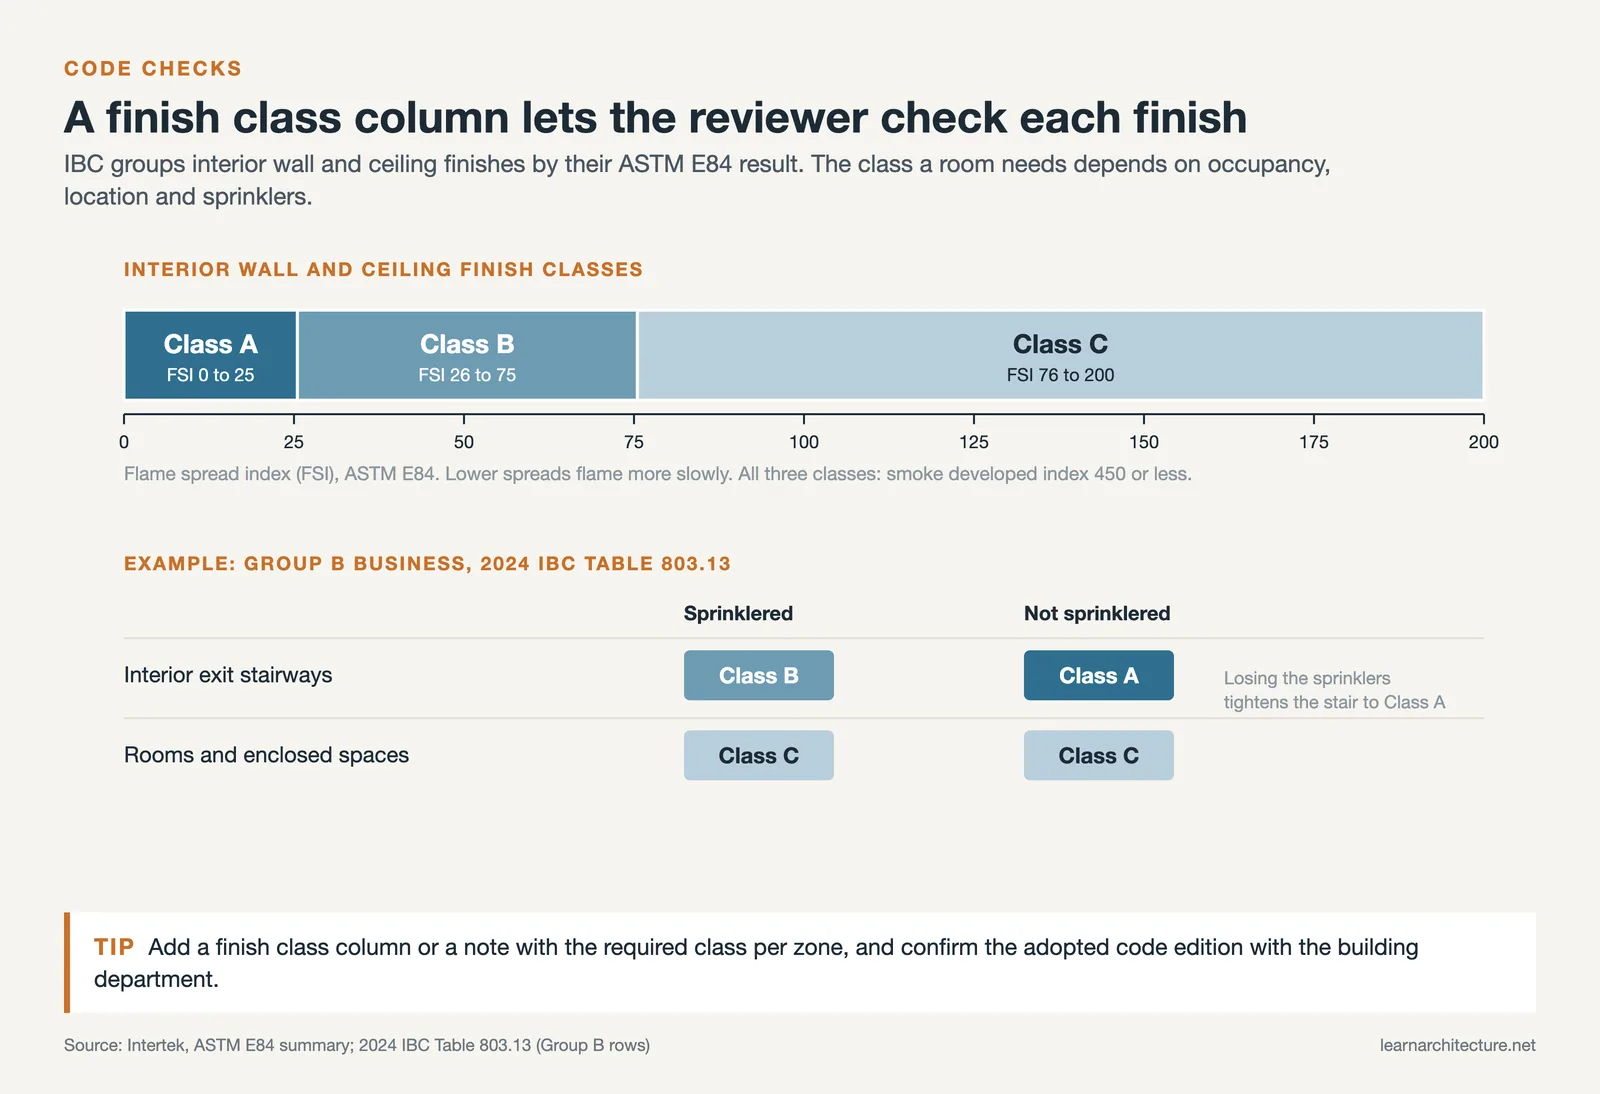
Which class a room needs depends on the occupancy group, the location and whether the building is sprinklered. IBC Table 803.13 sets the requirement. In the 2024 table, for a Group B business occupancy, interior exit stairways need Class B finishes when sprinklered and Class A when not, while rooms and enclosed spaces need Class C either way. A finish class column, or a note stating the required class per zone, lets the reviewer check every wall covering and acoustic panel without opening the product data.
Sustainability targets often travel the same way. If the project tracks low-emitting or recycled-content materials, add a column or a legend field for it rather than a separate list. The approach in the guide to interior design with sustainable materials is easier to verify when each code carries its own data.
Interior finish requirements vary by code edition, occupancy and local amendments. Confirm the adopted code with the building department for your project.
Building a Finish Schedule Template in Revit or a Spreadsheet
In Revit, the finish schedule is a room schedule: rooms carry finish parameters, and the schedule reads them. The part that saves real time is the key schedule.
📌 Did You Know?
Autodesk’s own help pages use finishes to explain Revit key schedules: a room schedule might have 100 rooms with the same floor, ceiling and base finishes, and instead of typing them 100 times you define a key once and apply it. Change the key, and every room that uses it updates.
A practical finish schedule template in Revit therefore has two schedules: a key schedule of room types (office, corridor, toilet, storage), each carrying its standard floor, base, wall and ceiling codes, and the room schedule itself, where each room picks a key and overrides only the exceptions. When the client changes the office carpet, one cell changes.
In a spreadsheet the same logic applies. Keep one tab for the legend, one for room types, and one for the room list, and use lookups so each room inherits its type’s finishes. Whatever the tool, the template should fix the column order, text height and sorting before the first project uses it.
Final Thoughts
A finish schedule looks like the most clerical sheet in the set, but it is where interior design intent becomes an order list. The rooms, the codes and the legend are three separate records that have to agree, and most finish schedule problems are really one of those three drifting away from the other two. Build them in that order, keep them linked, and the schedule stays trustworthy through every round of client changes.
Frequently Asked Questions
What is a finish schedule in architecture?
A finish schedule is a table in the construction drawings that lists each room by number and name and records the finish of its floor, base, walls and ceiling. Finishes are written as codes, and a legend or the specification defines the product behind each code.
What should a room finish schedule include?
At minimum: room number, room name, floor, base, wall and ceiling finishes, and a notes column. Ceiling height is worth adding, along with a column or note for the fire classification of wall and ceiling finishes.
What is the difference between a finish schedule and a finish plan?
The finish schedule lists what each surface is made of, room by room. The finish plan is a drawing that shows where finishes go when position matters, such as tile patterns, transitions under doors and feature wall extents.
How are walls listed in a finish schedule?
Either as a single wall entry per room with notes for exceptions, or as separate north, east, south and west columns. The single entry keeps the schedule narrow; the four columns suit projects with many accent walls. Pick one method for the whole project.












Leave a comment